Your cart is currently empty!
Experiment 3
Katse 3.1.1
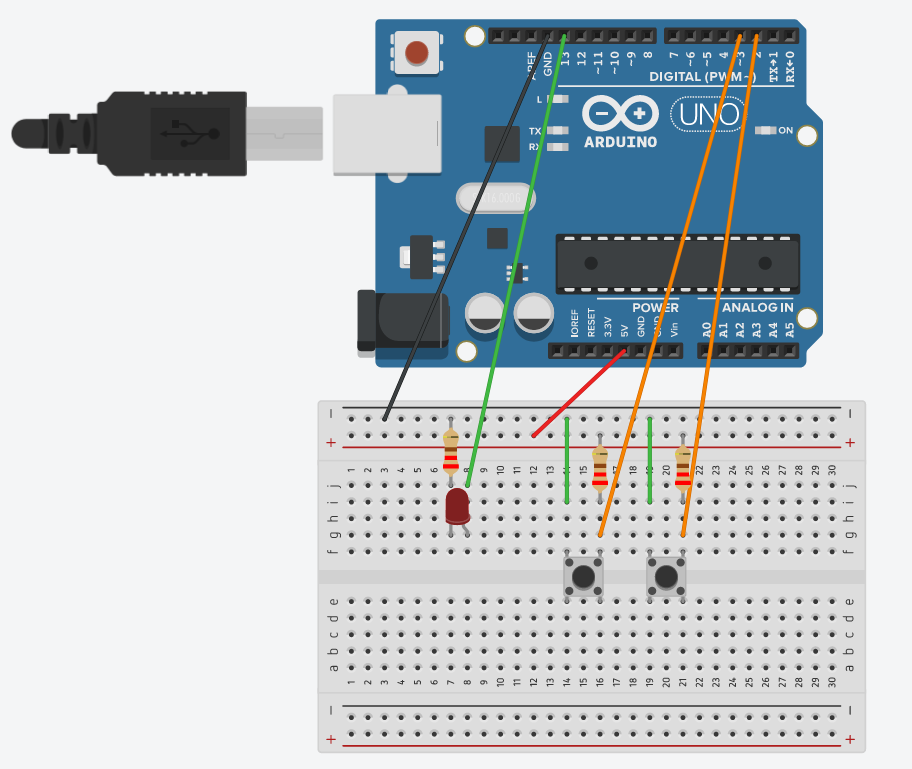
Komponendid:
Arduino UNO 1 tk.
Arendusplaat 1 tk.
Valgusdiood 1 tk.
Takistid 3 tk.
Juhtmed 7 tk.
Nupp 2 tk.
code:
const int button1Pin = 2;

const int button2Pin = 3;

const int ledPin =  13;

void setup()

{
  pinMode(button1Pin, INPUT);
  pinMode(button2Pin, INPUT);
  pinMode(ledPin, OUTPUT);

}

void loop()

{
  int button1State, button2State;
  button1State = digitalRead(button1Pin);
  button2State = digitalRead(button2Pin);
  if (((button1State == LOW) || (button2State == LOW))
      && !
      ((button1State == LOW) && (button2State == LOW)))
  {
    digitalWrite(ledPin, HIGH);
  }
  else
  {
    digitalWrite(ledPin, LOW);
  }
}
Katse 3.1.2

Komponendid:
Arduino UNO 1 tk.
Arendusplaat 1 tk.
Valgusdiood 1 tk.
Takistid 1 tk.
Juhtmed 7 tk.
Slideswitch 1 tk.
aku 1 tk.
code
int swPin = 4;
int ledPin = 10;
int switchState = 0;
void setup()
{
	pinMode(swPin, INPUT);
  	pinMode(ledPin, OUTPUT);
}

void loop()
{
	switchState = digitalRead(swPin);
  	if (switchState = HIGH)
    {
    	digitalWrite(ledPin, HIGH);
    }
    else
    {
    	digitalWrite(ledPin, LOW);
    }
}
Katse 3.2.1
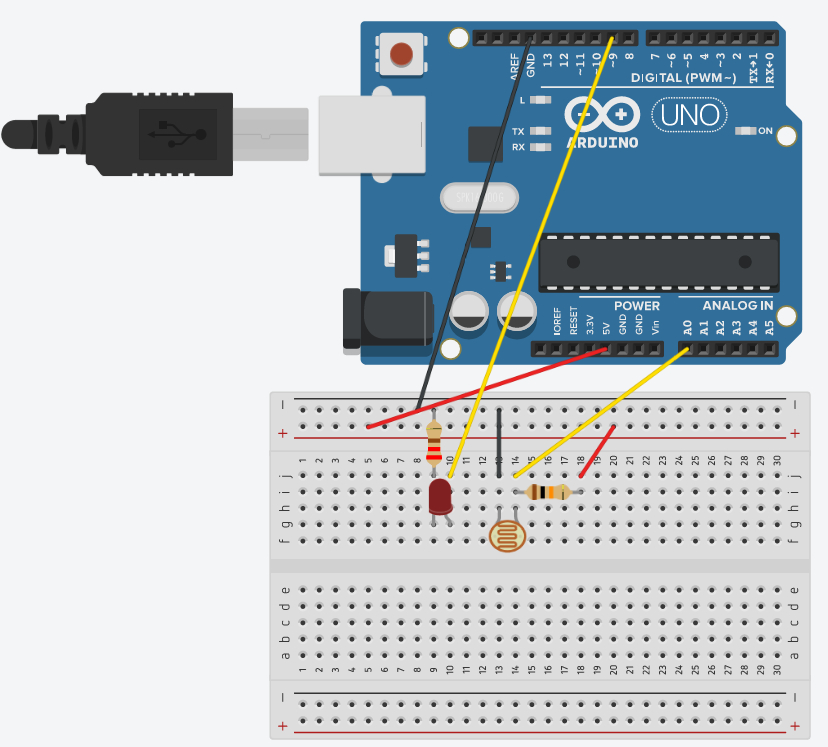
Komponendid:
Arduino UNO 1 tk.
Arendusplaat 1 tk.
Valgusdiood 1 tk.
Takistid 2 tk.
Juhtmed 6 tk.
Fototakisti 1 tk.
code:
const int sensorPin = 0;
const int ledPin = 9;
int lightLevel, high = 0, low = 1023;

void setup()
{
  pinMode(ledPin, OUTPUT);
  Serial.begin(9600);
}

void loop()
{
  lightLevel = analogRead(sensorPin);
  manualTune();
  analogWrite(ledPin, lightLevel);
  Serial.print(lightLevel);
  Serial.println("");
  delay(1000);
}

void manualTune()
{
  lightLevel = map(lightLevel, 300, 800, 0, 255);
  lightLevel = constrain(lightLevel, 0, 255);
}
Ülesanne RGB öölamp
Selles töös tegin öölambi kasutades RGB LED-i. See töötab nii, et kui valgus langeb fototakistile, siis valgus ei sütti, kui vastupidi, see süttib. Selles arenduses on neli režiimi: kui töötab ainult punane, ainult sinine, ainult roosa, ainult roheline ja kui midagi ei põle. Režiime vahetatakse potentsiomeetri abil
Komponendid:
Arduino UNO 1 tk.
Arendusplaat 1 tk.
RGB LED 1 tk.
Takistid 4 tk.
Juhtmed 12 tk.
Potensiomeetr 1 tk.
Fototakisti 1 tk.
Kasutamise näited:
Selle seadme rakenduseks on tavaliselt väike dekoratiivlamp, mida kasutatakse pimedate ruumide või aeg-ajalt pimedaks muutuvate ruumide valgustamiseks.

code:
const int sensorPin1 = 1;
int sensorPin = 0;
int lightLevel, high = 0, low = 1023;
const int RED_PIN = 7;
const int BLUE_PIN = 8;
const int GREEN_PIN = 9;

int sensorValue = constrain(sensorValue, 10, 150);
int Value_new;

void setup()
{
  pinMode(RED_PIN, OUTPUT);
  pinMode(BLUE_PIN, OUTPUT);
  pinMode(GREEN_PIN, OUTPUT);
}

void loop()
{
  digitalWrite(RED_PIN, LOW);
  digitalWrite(BLUE_PIN, LOW);
  digitalWrite(GREEN_PIN, LOW);
  lightLevel = analogRead(sensorPin1);
  manualTune();
  Value_new = analogRead(sensorPin);
  Value_new = map(Value_new,0,1023,1,5);
  if (Value_new == 4)
  {
    red();
  }
  else if (Value_new == 3)
  {
    blue();
  }
  else if (Value_new == 2)
  {
    green();
  }
  else if (Value_new == 1)
  {
    red_blue();
  }
  else
  {
    analogWrite(RED_PIN, LOW);
    analogWrite(BLUE_PIN, LOW);
    digitalWrite(GREEN_PIN, LOW);
  }
}
void red_blue()
{
  analogWrite(RED_PIN, 255-lightLevel);
  analogWrite(BLUE_PIN, 255-lightLevel);
}
void green()
{
  analogWrite(GREEN_PIN, 255-lightLevel);
}
void red()
{
  analogWrite(RED_PIN, 255-lightLevel);
}

void blue()
{
  analogWrite(BLUE_PIN, 255-lightLevel);
}

void manualTune()
{
  lightLevel = map(lightLevel, 300, 800, 0, 255);
  lightLevel = constrain(lightLevel, 0, 255);
}